This portfolio will be dedicated to the attempt in designing, constructing and attempted creation of a 60 seconds 3D rendered video that is required for the assignment. This portfolio will go through the various stages of planning, creating, and finalising the product, with imagery to show a visualisation of the progress done.
Description & planning
Obviously the first step when it came to figuring out the assignment was to figure out and have a rough plan as to what I would plan on doing for the assignment. Several idea’s were considered, mostly based around horror genre idea’s, these idea’s would range from something similar to slender the 8 pages, before settling on a looping hallway idea, to be precise, it would be based around the looping hallway featured in P.T, below is an image example of the environment that I would be looking to create.
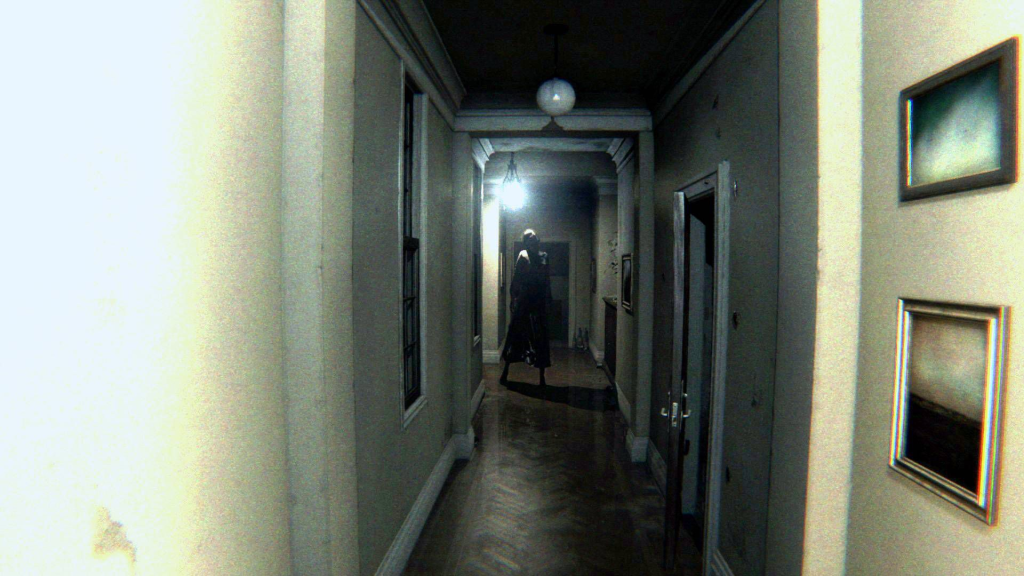
This idea was chosen not only for its general simplicity in an overall environment, along with how P.T managed to have a unique impact on users with how it handled horror, but also with it looping constantly, it would save time and resources in using the same environment again and again but with subtle changes, as opposed to creating an entirely new environment for a new scene, which would take substantially more time, which may leave less time for more polish and VFX experimentation. This idea would charge throughout the development process in a handful of ways, though I do believe the overall premise stayed relatively the same.
Obviously, just making a rough replica of the environment P.T uses but with a few modifications would not only be too basic (since it’s literally just an L shape over and over again) but it would not fit what I was looking for. The environment would have to be a bit more advanced, especially since various VFX would have to go within the environment itself, so cramming it into the same hallway over and over again would just seem impractical. Many concepts were tried for various hallway designs, though after much trial and error, these 3 designs were what I ended up settling with, especially since I decided to slightly change the idea in having the environment alternate between various hallways, as to prevent it from quickly getting stale.
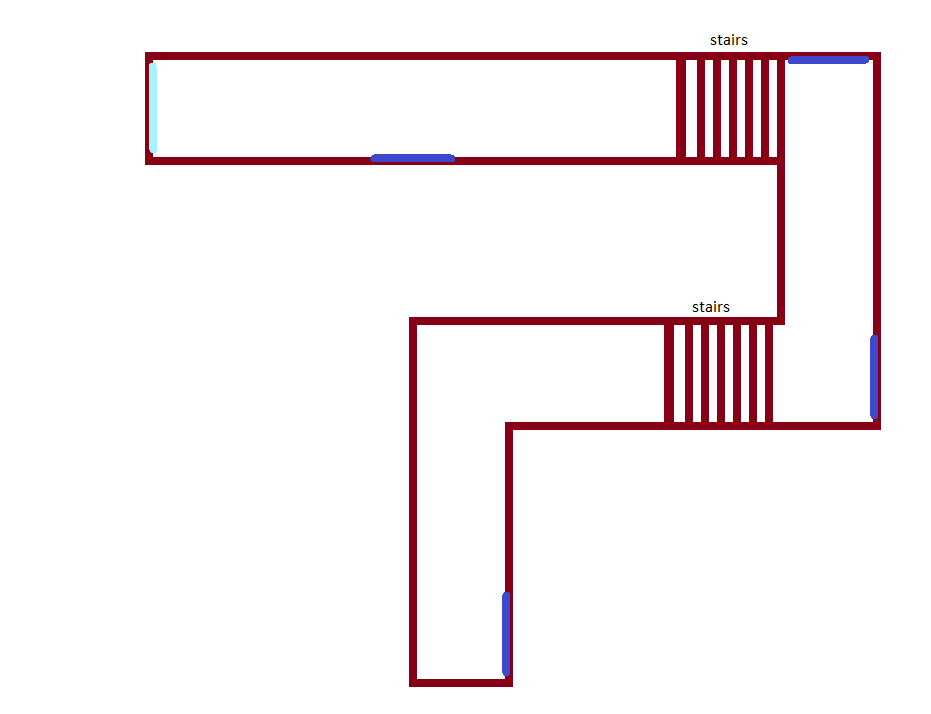
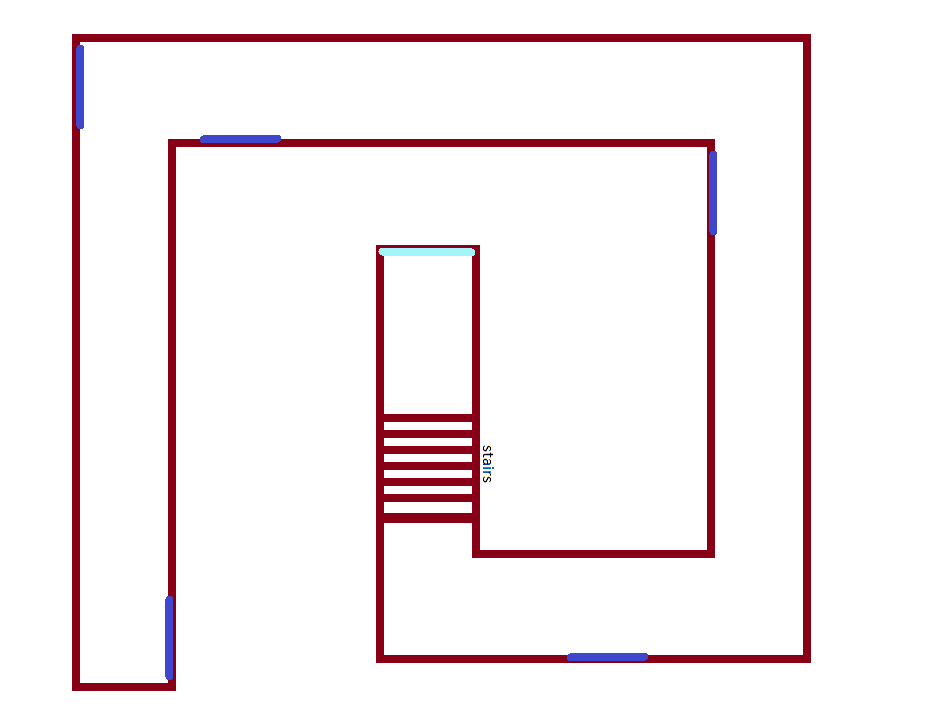
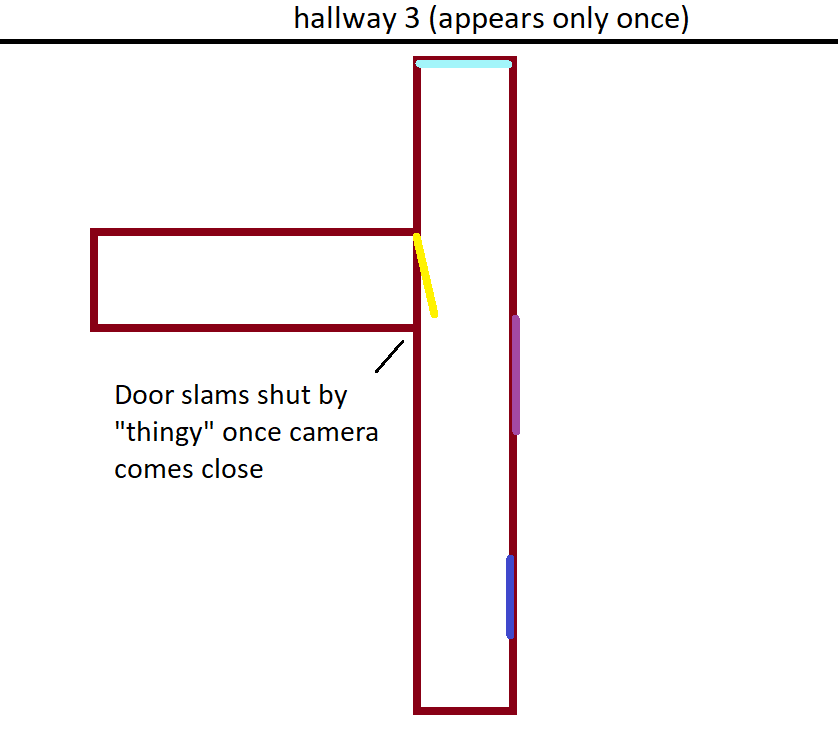
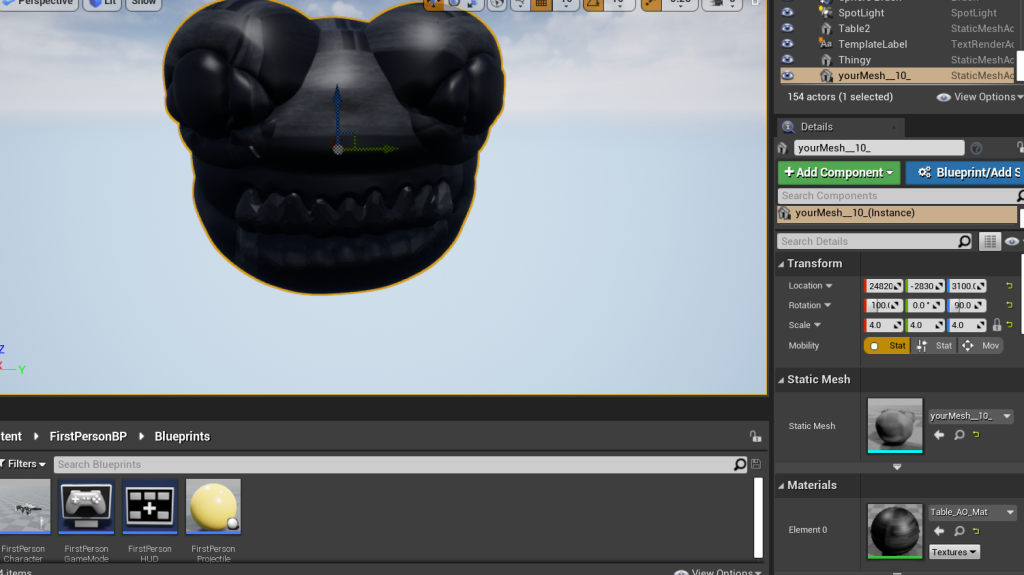
The first 2 designs were made with the intention of having the camera go through them on multiple occasions, with subtle differences for each time the camera re-enters the same hallway. Though this would not be applied to the 3rd hallway, which the camera would only go through a single time throughout the video. This was chosen both because of specific effects that I planned for that hallway, but also due to its design being much simpler and not as complex. Also at the time these screenshots were taken, “thingy” was used as a placeholder name for the entity in which I would have stalking the camera throughout the environment, and it would get its official name later down the line when more progress had been made.
A main lobby room was also then created. This room would serve as the starting point of the 60 second video we would have to make. The room would also have the door that would initiate the looping.
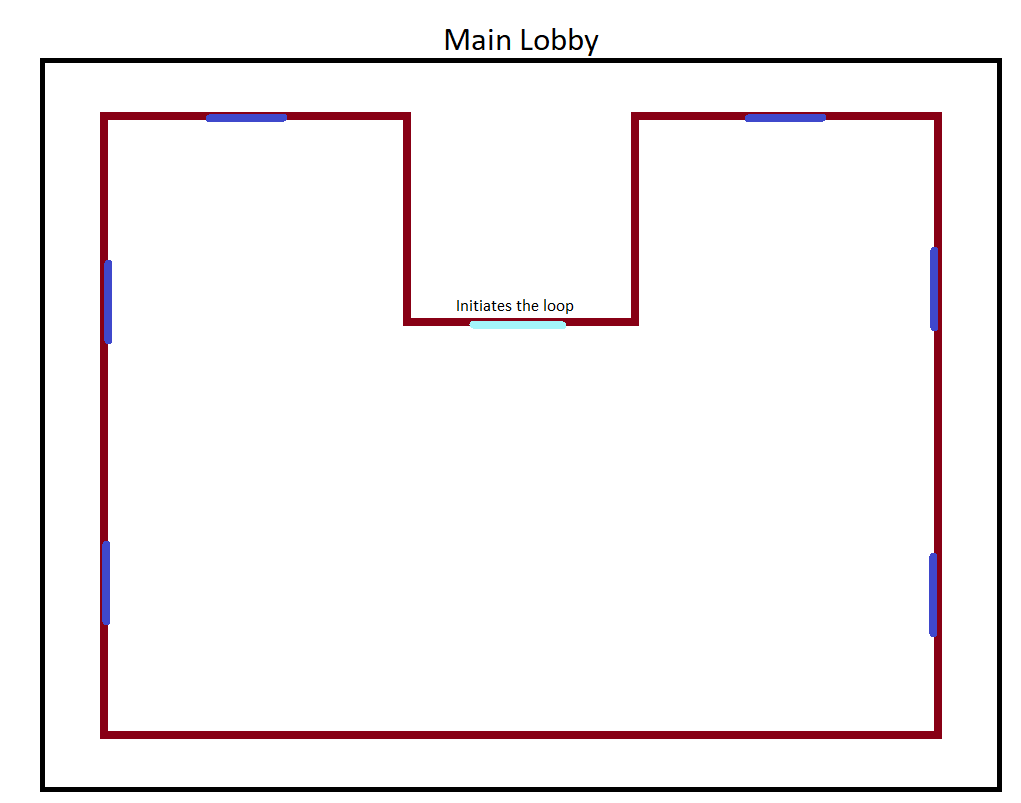

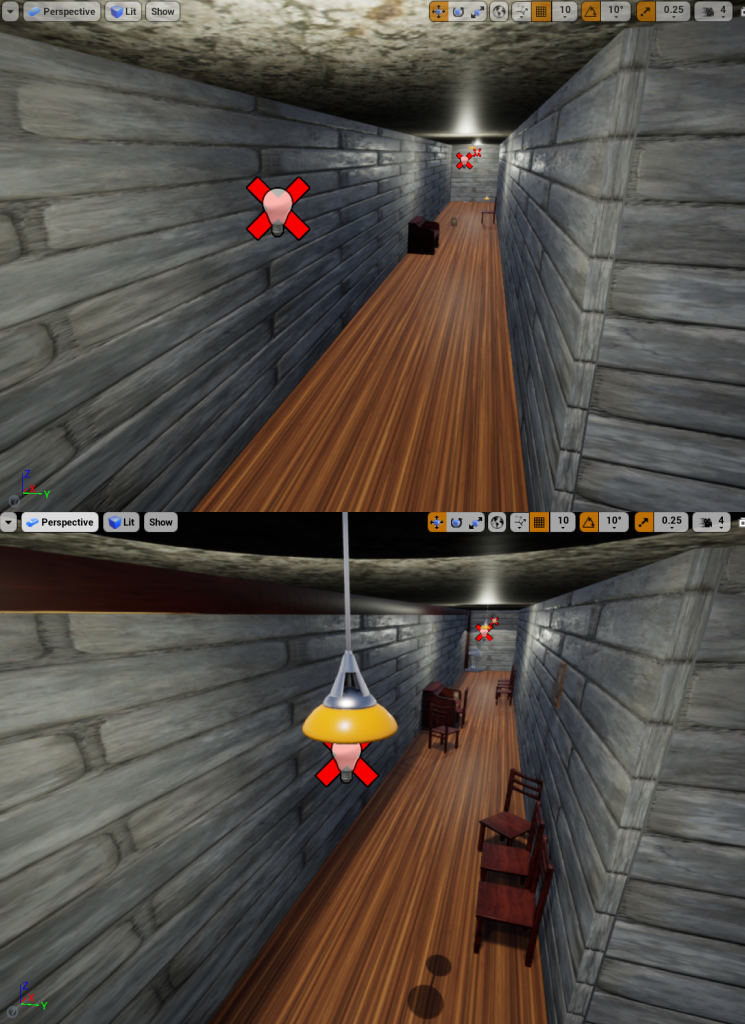
A simple diagram would then be created as to link the separate environments together. A duplicate of these environment plans were then created as to plan both the general camera movement, and general VFX that would take place throughout the environment.
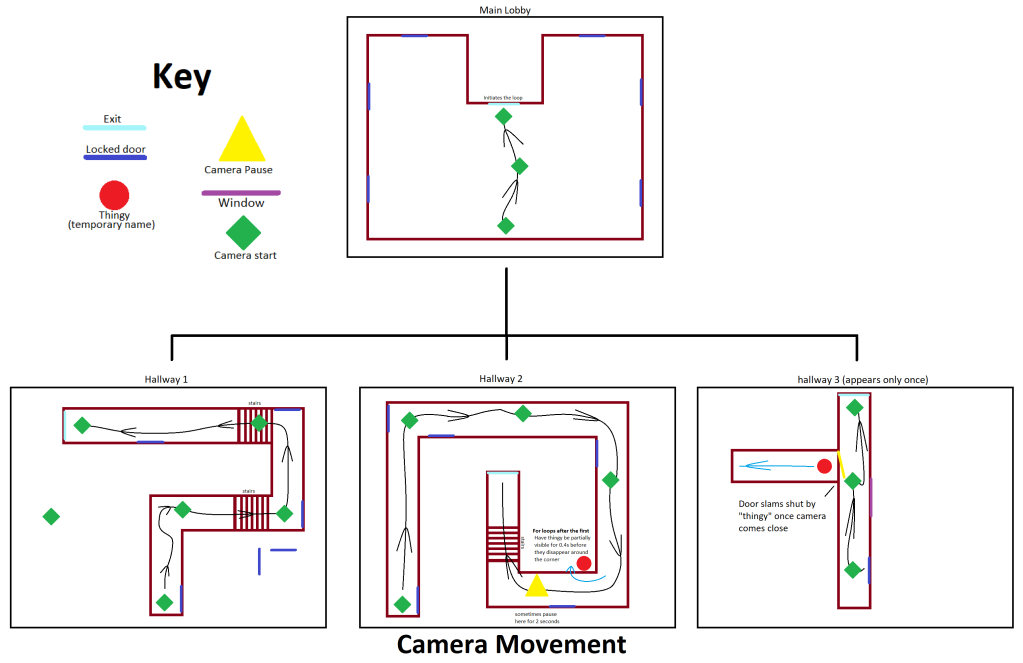
A key chart was created and placed to the left of the plan as so that it could easily be referenced and identified as to which symbol meant what. The camera (as represented by a green diamond shape), has a black line that I plan to have follow a specific path throughout the environment. I do plan on having a moment where the camera does pause at a specific part just before a corner, as to give it a specific feeling of eeriness and anxiety to the viewer before turning the corner. The 3rd hallway I also plan on having an event trigger where once the camera comes within close proximity of the door, the “thingy” would reach for the handle and slam the door in the camera’s face, causing it to stumble backwards slightly before rushing off to the exit.
This is a direct reference to a specific scene in P.T, where the player approaches the door to the bathroom to investigate, after they begin hearing the sound of a baby crying from inside. When the player zooms in on the crack through the door, Lisa pulls on the door and slams it in the players face.
After planning out the various camera movements as well as other things, next came a plan for general VFX’s and their placement.

One thing to keep in mind, is that a majority of these VFX are planned to come into play after the hallways start looping, which takes place once the player passes through hallway 3. The VFX I plan on using would mostly consist of flickering lights and mist, though hallway 3 does have plans for a lightning effect through one of the windows, which is exclusive to that hallway (though this is subject to change at a later time).
Whilst this would be a very primitive and basic set of events, I would be happy with my selection, and would begin the process of constructing the environment in unreal engine.
Creating the environment
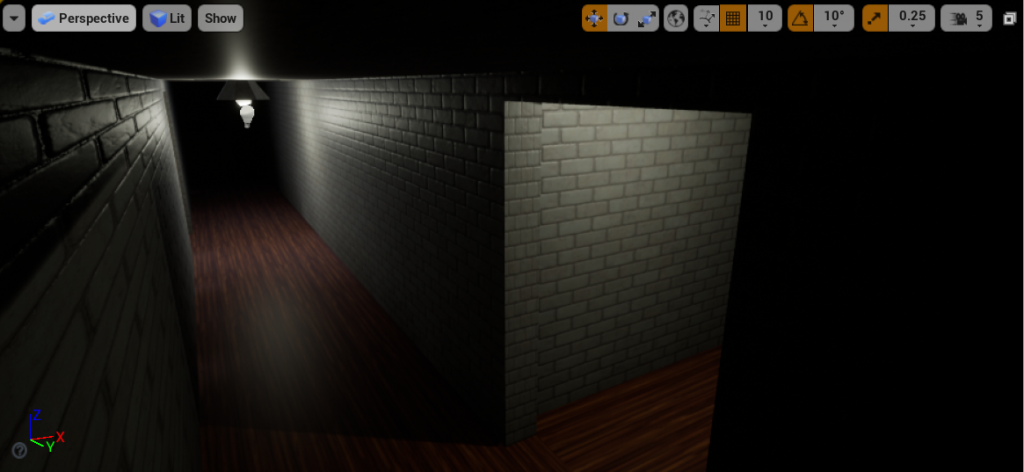
This next section will jump into the process of making the block out for the environment. The environment that I would be making would consist of a series of hallways, that would constantly loop on each other. As to make the transition between each part of the environment smoother, the whole thing would be split into 3 different sections. One being the main hub area where the scene would initially start, and then the 3 hallways that the camera would continuously loop through.
The environments were built in this separated way, as to ensure that things would run a lot smoother, and to avoid any parts of the environment overlapping or running into each other (which would cause major issues with clipping & lighting). No objects would be added to the scene yet since I wanted to ensure that the environment that was being created, was the way that I wanted it to roughly look, before implementing all the necessary assets to add in the (albeit minimal) life to the scene.
It was decided later into the development of the environment that the idea for windows would be removed, since I wanted the environment to give the feeling of not only being in a bit of a claustrophobic liminal space, but to also have it feel like there is only one direction that they can take, inevitably forcing them into a dead end.
Once the textures were applied to the walls, I began to search for items to litter across the various rooms. Granted this is quite problematic in trying to find anything that had the correct file type for unreal engine, though after spending many hours searching for the necessary objects, several were found that were what I was looking for.
I had initially planned to change the idea mid-way through production, thinking that just a series of hallways looping over and over again would seem rather plain and dull, though after thinking about what my other options were, I decided to continue and just carry on with the progress that I had already made, after all, there was no point in changing it anyway.
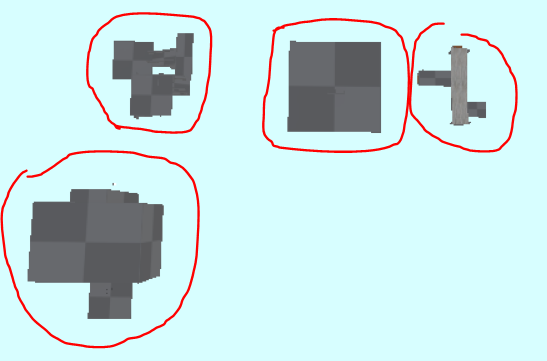
In my search for an asset that had a creepy like design, I happened to stumble across this on Sketchfab.
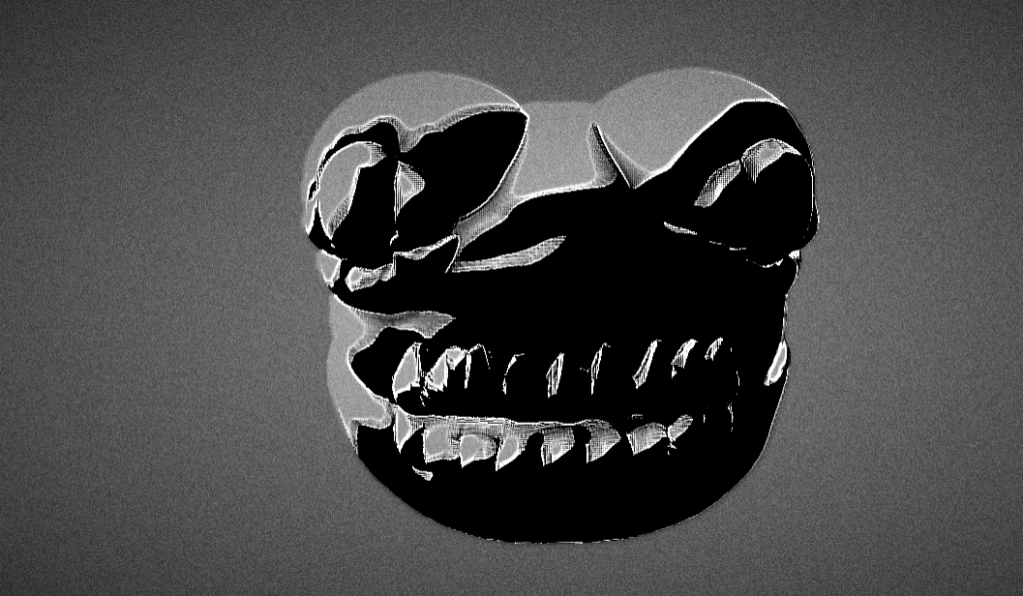
Whilst the preview provided showed the “object” to have a rather strange and unnatural like appearance to it, it was the general creepy design of whatever this thing was, that made me shift where I wanted to take the project. I quickly placed into the scene. Unfortunately the object did not come with any textures, so I had to improvise by giving the asset the textures of the table, which whilst it didn’t fit it at all outside of making it near completely black, given that I plan on having the asset next to completely shrouded in darkness, it didn’t affect too much what I was planning on doing.
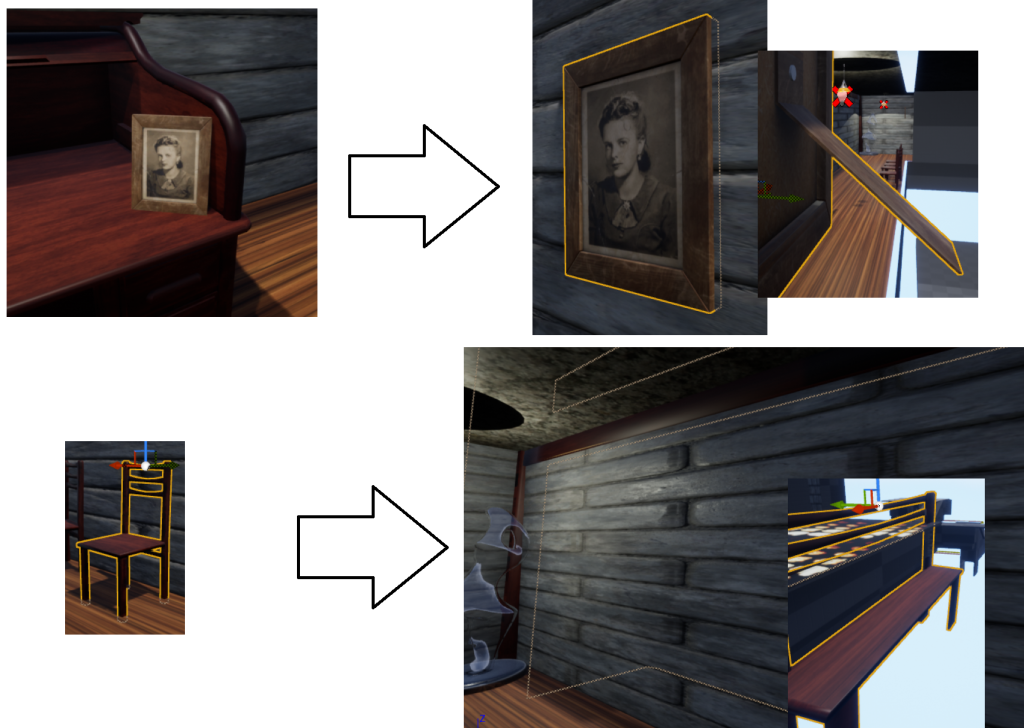
With that out of the way, I began to look up more ways to decorate the hallways in question, as having only a single one would not do, and thus would make the hallways in their initial form seem way too bland and boring, so I went back to sketchfab, and began my search for more objects to fill the scene, these objects would range from a picture frame, to a chair from Sketchfab, as well as one of the built in objects within Unreal engine 4, being the ceiling lamp, and the glass statue.
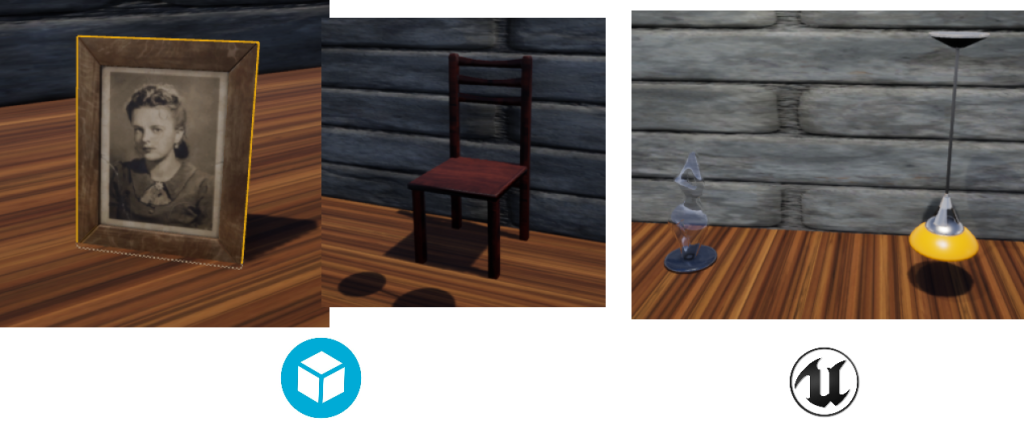
Copies of these objects would be made which would then be littered across the various hallways too give it a more life-like appearance.
To save time and resources, some assets were modified to be given multiple purposes without having to waste time in attempting to find new ones (a common method map makers often do in order to save money, as well as get the most out of the assets that they create). Extra history, a youtube channel dedicated to the history of game design, literature, television etc, made a video explaining the process of re-using assets and how if done correctly, can not only save time and costs in terms of the development side of making a game/animated film, but can also enhance the experience of the product if done properly.
This process of reusing assets would be done in 2 ways, the picture frame, which whilst the object was intended to be placed on a desk, was enlarged, and then shoved into the wall, hiding the back part of the picture frame to make it look as if was hung on a wall, and the chair model by enlarging it to a comically large size to give the far wall a nice frame like appearance.
This process would then be repeated for the other hallway’s and area’s that would be a part of the 60 second video, as to give them a bit of life as well, before setting up the camera’s to begin the filming. What I failed to anticipate however, was the process being a lot more convoluted and problematic than initially anticipated.
Whilst I was able to lay down a set of track for the camera to use, attempting to get the camera to work the way I wanted it to proved to be difficult and extremely tedious, even when looking up multiple sources in an attempt to figure out how to work them. The most I was able to manage, was a set of track in the beginning area, though due to the aforementioned difficulties, I decided to opt for a more manual solution, that being to move around the environment myself, and act as the camera.
Since I had to act as the camera, I wanted to get a smooth view for it so that it can make transitioning from scene’s easier. This cannot be done at all with default camera settings, especially if the user in question (such as myself) have relatively unsteady hands when it comes to tasks that require precise hand movement. Luckily thanks to a tutorial I found online by the user Fools erand, they offered the exact resources that I was looking for, and allowed me to have a smooth camera to mask the unprecise hand movements.
They explained that by attaching a spring arm component to the camera, and then adding in lag via additional components & rotations, you can get a nice smooth camera (similar to when pressing F3 in Minecraft Java for example)
Now with a smooth camera in hand, it was time to begin the filming process. It actually felt a lot more comfortable and easy to use, since I can hold in certain positions for as long as I need to, as well as set up green screen effects in however fashion was needed (which was needed for one part, which was done first).
Before filming, I needed to make sure that OBS was set up properly to record in 1080p (which was the minimum that the assignment asks for). Double checking the requirements, I did notice that a frame rate was not specified within the requitements.

Knowing this, I had 3 options to pick for when it came to recording, either 24 frames per second, which is the standard for what movies use. 30 which is the most common choice across all social media. Or 60, which makes it smooth and nice to look at, but at the cost of requiring a high bit rate (usually 8000kbs), which also causes the file created to be very large in the process. Thinking my options, and testing to find out what my laptop was capable of (it can record 60FPS via a capture card, though not when unreal is open due to it blue screening mere seconds into the recording, likely due to unreal hogging a lot of the machines resources), I decided to stick to 24 frames per second as my frame rate, with a bit rate of 3000kbs, since it would be fast enough to meet movie standards, whilst still being at a reasonable rate that my laptop can handle whilst unreal is running simultaneously.
It was also at this time that I decided to slightly shift how I would execute the idea. It would still use the hallways in a horror like fashion, but it would deviate from the looping theme that I had originally intended.
Once the footage was recorded and checked for any errors (it had one, though it can easily just be removed via post production editing), it was uploaded to a google for me to transfer over to begin the post production editing process. My software of choice for this task would be through the use of Capcut, as it is an editing software that I am familiar with, and know how to use quite well.
The music and sound effects used throughout the video were each from existing sources, as well as altering them to fit the feeling of what I was hoping to achieve. A full list of all the sounds/music samples can be found at the bottom of the document, along with what was done to them as to make them fit.
Since capcut was a software that I had quite a plethora of experience with, adding in all of the post production & effects was little challenge, and was mainly about altering things to see what fit, and what didn’t. I applied various effects and filters as to give it a found footage like feeling, as well as adding in a little bit of a narrative before the official video starts as to tie the whole production piece together.
With the piece eventually finished after 2 days of editing and going through countless revisions, this would end up being the product that I ended up most satisfied with, and can comfortably hand in, with it also shooting quite a bit beyond the 60 second requirement, clocking in at a minute and 45 seconds.
Conclusion
Overall, whilst the final product that I ended up making for the assignment, ended up being vastly different than what I had initially planned, I did learn some critical and key information throughout this course, even if it has proven to be rather difficult for me to grasp due to requiring a second attempt at it.
Whilst fun experimenting and coming up with idea’s and concepts for this subject, it has shown to be very difficult, especially in the hands of a novice.
Sketchfab object references
Table – https://sketchfab.com/3d-models/table-d56481de55aa48f182a2c8c3105df5fb [accessed 01/01/2023]
“Normal Human” – https://sketchfab.com/3d-models/normal-human-9efea44e13f7430bb413466903c519dc [accessed 02/01/2023]
Picture frame – Picture Frame – Download Free 3D model by Freepoly.org (@blackrray) [a94047d] (sketchfab.com) [accessed 29/06/2023]
Chair – CHAIR – Download Free 3D model by vUv (@vovaustimuk) [b07d263] (sketchfab.com) [accessed 30/06/2023]
Image/video References
DanielleRiendeau (2014) P.T depict your everyday haunted house [photograph] Available Online: https://www.polygon.com/2014/9/2/6098945/pt-silent-hills-ghost-photos [accessed 18/11/2022]
SHN Survival Horror Network (2015) P.T. SILENT HILLS Full HD 1080p/60fps Longplay Walkthrough Gameplay No Commentary [Video] Available Online: https://youtu.be/bjDmGGtglEY [accessed 18/11/2022]
Extra History (2020) Asset Reuse – Working Smarter, Not Harder – Extra Credits Available Online: Asset Reuse – Working Smarter, Not Harder – Extra Credits – YouTube [accessed 03/07/2023]
Fool’s Errand (2016) UE4 Tutorial: Smooth First Person Camera Available Online: UE4 Tutorial: Smooth First Person Camera – YouTube [accessed 11/07/2023]
audio/music sources used in 60 second video
Capital Gains Henry Stickmin (2020) FNaF 1 Chica Kitchen Noise Available Online: FNaF 1 Chica Kitchen Noise – YouTube [accessed 27/07/2023]
Modification – Slowed, pitch bent down, added reverb
Kongers (2015) FNAF 3 Ambience Extended Available Online: FNAF 3 Ambience Extended – YouTube [accessed 27/07/2023]
Modification – Slowed, reversed, distorted
2MirrorsDialogue (2018) Glitch Sound Effects Available Online: Glitch Sound Effects – YouTube [accessed 27/07/2023]
Modification – Slowed
Her Sweet Pete (2015) P.T. Silent Hills creepy ambient music (PS4) Available Online: P.T. Silent Hills creepy ambient music (PS4) – YouTube [accessed 28/07/2023]
Modification – Slowed with added reverb
SoundClips (2014) Auto Camera Lens Sound Effect Available Online: Auto Camera Lens Sound Effect – YouTube [accessed 28/07/2023]
Modification – Slowed
NOCOM (2022) Sonic.EYX – Full Game – No Commentary Available Online: SONIC.EYX – Full Game – No Commentary – YouTube [accessed 28/07/2023]
Modification – Added Reverb
Knightwalker 616 (2017) Five Nights At Freddy’s | Foxy Running Available Online: https://youtu.be/hSLn5nWqXaY [accessed 29/07/2023]